Preliminary Results Optimizing L1-Magic (5-80x Speedup)

l1magic_cover_smClick to Download Presentation

L1-Magic is old interior-point library developed by Justin Romberg around 2005.  It solves seven problems related to compressive sensing and the convex relaxation of L0 problems:

  1. Basis Pursuit ( L1 with Equality Constraints, P1):
    \( \min{\lVert x \rVert_1} \text{ subject to } Ax=b \)
  2. Decode (PA):
    \( \min_{x} \lVert y-Ax\rVert _1 \)
  3. L1 w/ Quadratic Constraints (P2):
    \( \min{\lVert x \rVert_1} \text{ subject to } \lVert Ax – b \rVert \leq \epsilon \)
  4. Dantzig Selector (D): 
    \( \min{\lVert x \rVert_1} \text{ subject to } \lVert A^*(Ax – b) \rVert_\infty \leq \gamma \)
  5. Total Variation with Equality Constraints (TV1):
    \( \min{TV(x)} \text{ subject to } Ax=b \)
  6. Total Variation with Quadratic Contraints (Tv2):
    \( \min{TV(x)} \text{ subject to } \lVert Ax – b \rVert \leq \epsilon \)
  7. Dantzig TV (TVD)

In the attached presentation given to the Georgia Tech CSIP Compressed Sensing Group and the So-Called “Children of the Norm”, I show how modifications to a handful of lines of code in L1-Magic can result in

  1. Substantial speed improvement
  2. Increased Stability
  3. Reduced Memory Usage

To do this, I use the following limitations

  1. No new fundamental methods
  2. No MEX Allowed
  3. No GPU or Parallelization

The improvements are made to Basis Pursuit,  L1 with Quadratic Constraints, and TV1 with various degrees of success:

  1. Reducing unnecessary memory allocations using sparse matrix multiplies and Hadamard products (P1)
  2. Exploit Low Rank Structure in matrix A using the Woodbury Identity (P2)
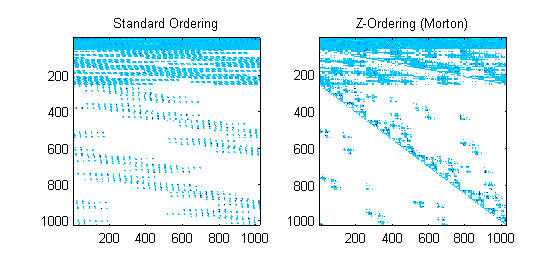
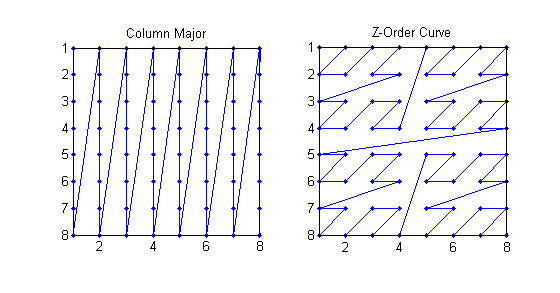
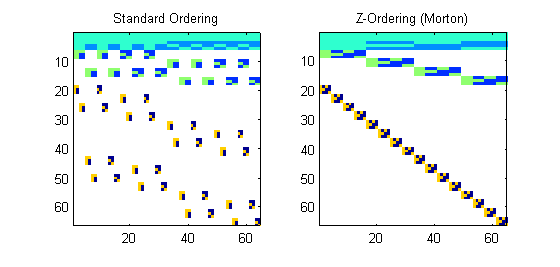
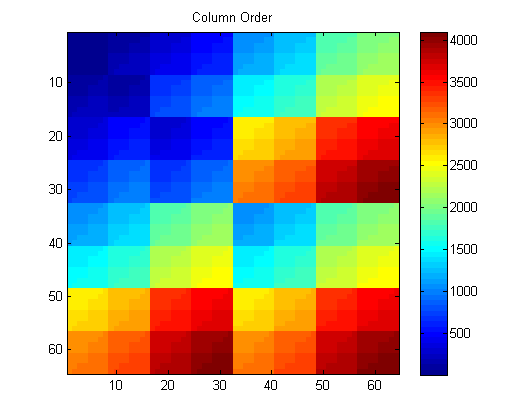
  3. Exploit Block Structure to save on processing and memory usage (Tv1)

One substantial contribution is that the l1qc (P2) code displayed substantial stability issues. For low rank problems, we completely  fix this issue and show ~100x speedup on certain problems.  Results are dependent on the shape of A (low rank gives us better results) and incorporating these results may require switching methods between the current implementation and these proposed changes  as m approaches n.

l1eq_comparison


Zernike Polynomial

A quick implementation of of Zernike polynomials for modeling wavefront aberrations to to optical turbulence. Equations pulled from  Michael Roggemann’s Imaging Through Turbulence.

Zernike polynomials are often used to model wavefront aberrations for various optics problems. The equations are expressed in polar coordinates, so to calculate the image we first convert a grid into polar coordinates using the relation

\(y = r\times sin(\theta) \)
\(r = \sqrt{x^2 + y^2} \)
\(\theta = tan^{-1}\frac{y}{x}\)

And then calculate the Zernike Polynomials as

\(Z_{i,even}(r,\theta) = \sqrt{n+1}R^m_n(r)cos(m\theta) \)
\(Z_{i,odd}(r,\theta) = \sqrt{n+1}R^m_n(r)sin(m\theta) \)
and \(Z_{i}(r,\theta) =R^0_n(r)\) if \(m=0\)

Where the functions \(R^m_n(r)\) are called Radial Functions are are calculated as

\(R^m_n(r) =\sum_{s=0}^{(n-m)/2} \frac{(-1)^s(n-s)!}{s![(n+m)/2 – s]![(n-m)/2 – s]!} r^{n-2s} \)

With Noll normalization. Certain polynomials have names. First is \(Z_1\), know as Piston as is often subtracted to study of single aperture systems. Next, \(Z_2\) and \(Z_3\) are ramps that are called tilt and cause displacement. \(Z_4\) is a centered ring structure known as defocus while \(Z_5\) and \(Z_6\) are astigmatism, \(Z_7\) and \(Z_8\) are coma, and \(Z_{11}\) is spherical aberration.

They can be imaged as follows:

Zernike Polynomial Z_13_4_2 Zernike Polynomial Z_1_0_0 Zernike Polynomial Z_2_1_1 Zernike Polynomial Z_3_1_1 Zernike Polynomial Z_4_2_0 Zernike Polynomial Z_5_2_2 Zernike Polynomial Z_6_2_2 Zernike Polynomial Z_7_3_1 Zernike Polynomial Z_8_3_1 Zernike Polynomial Z_9_3_3 Zernike Polynomial Z_10_3_3 Zernike Polynomial Z_11_4_0 Zernike Polynomial Z_12_4_2

All created using the following code:


function result = z_cart(i,m,n, x,y)
%Z_POL result the zernike polynomial specified in cartesian coordinates

% calculate the polar coords of each point and use z_pol:
r = (x.^2 + y.^2).^(1/2);
thta = atan2(y,x);

result = z_pol(i,m,n,r,thta);

end

function result = z_pol(i, m,n, r,t)
%Z_POL result the zernike polynomial specified in polar coordinates

if(m==0)
    result = radial_fun(0,n,r);
else
    if mod(i,2) == 0 % is even
        term2 = cos(m*t);
    else
        term2 = sin(m*t);
    end
    
    result = sqrt(n+1)*radial_fun(m,n,r).*term2;
end

end

function result = radial_fun(m,n,r)
%RADIAL_FUN calculate the radial function values for m,n, and r specified
result = 0;

for s = 0:(n-m)/2
    result = result + (-1)^s *factorial(n-s)/ ...
        (factorial(s)*factorial((n+m)/2 -s)*factorial((n-m)/2-s)) *...
        r.^(n-2*s);
end
end

Matlab R2014b CPU and GPU Matrix Multiply Time Comparison

Matlab has incorporated GPU processing on the parallel computing toolbox and you can create GPU array objects using the gpuArray(…) function in MATLAB. I created a brief script to compare  matrix multiply of a 2048 x 2048 matrix against a vector. Ordinarily, the CPU operations see reasonable speedup (~2x) from moving from double to single precision values. However, moving to the GPU implementation results in a speedup of  6.8x for Double and  5.6x for Single! This means that if you can take a matrix-vector multiply that is double precision and convert it to single precision GPU version, you may see  a gain of nearly 14x.

The following we generated in Matlab R2014b on an i7-4770 3.5 Ghz CPU  (8 CPUs) with 16GB Ram and a Geforce GTX 750.

CPUGPUTimingMatlab2014bGPUSpeedupThe next step is to evaluate speed of the gpuArray on a basic L1 Optimization set—l1 magic.

The code used to generate this data is as follows:


allTypes = {'Double', 'gpuArrayDouble', 'Single', 'gpuArraySingle'};
allTimes = nan(length(allTypes),1);

n = 2048;       % size of operation for Ax
num_mc = 2^10;  % number monte carlo runs to compute time average of runs

randn('seed', 1982);
Am = randn(n,n);
xm = randn(n,1);      

for ind_type = 1:length(allTypes)
   
    myType = allTypes{ind_type};
     
    switch lower(myType)
        case 'double'
            A = double(Am);
            x = double(xm);
        case 'single'
            A = single(Am);
            x = single(xm);
        case 'gpuarraydouble'
            A = gpuArray(Am);
            x = gpuArray(xm);
        case 'gpuarraysingle'
            A = gpuArray(single(Am));
            x = gpuArray(single(xm));
        otherwise
            error('Unknown type');            
    end    
    
    tic
    for ind_mc = 1:num_mc
        y = A*x;
    end
    allTimes(ind_type) =  toc/num_mc;
    
end

%% Display the results
figure(34);
clf;
bar(allTimes*1000);
set(gca, 'xticklabel', allTypes, 'color', [1 1 1]*.97);
title(['Timing of CPU and GPU in M' version('-release')]);
xlabel('Type');
ylabel('Time (ms)');
grid on

%%
figure(35);
clf;
speedupLabels = {('Double to Single') , ...
                 ('Double to gpuDouble'), ...
                 ('Single to gpuSingle'), ...
                 'Double to gpuSingle'};
bar([allTimes(1)/allTimes(3), allTimes(1)/allTimes(2),  ...
    allTimes(3)/allTimes(4), allTimes(1)/allTimes(4)]);
set(gca, 'xticklabelrotation', 15, 'xticklabel', speedupLabels, 'color', [1 1 1]*.97);
title(['Speedup of CPU and GPU in M' version('-release')]);
xlabel('Type');
ylabel('Speedup');
grid on

Z-Order Curve and Wavelets

The Z-Order (Morton) Curve describes an ordering a 2-D image in memory so that points in the image that are close in Euclidean distance are similarly close in memory. It can be compared to column-major ordering where pixels are simply lined up according to columns. This makes indexing easy but breaks all locality and can make linear transformations appear overly complex.

ColumnMajorVersusZOrderI wanted to visualize how this ordering changes locality be visualizing the wavelet transform that has been similarly modified to account for an image being placed in memory with the z-order curve. By placing each 2D wavelet as a row in the matrix and then displaying it as an image we get the following:

First, the Haar wavelets for an 8×8 image:

ordering_8x8_haarNotice how the column major ordered wavelets have large breaks that scatter the pieces of each wavelet across memory. However, the properly z-ordered image results in a stacked, block diagonal transform. Note that special care has to be taken since the wavelets are stored in levels and for the Wxx Wxy and Wyy. We stack the wavelets in an order from the largest level to smallest. Then, for each level, we group together wavelets for each pixel so that the result is the strong block diagonal patterns. For example, the row order for the matrix may be as show here:

columnOrderWhere we start in the top left and then for each levels quadrant we move in the z-order curve for that quadrant.

Large matrices result in more fragmented memory for column major order, while the z-ordering preserves the diagonal pattern.

ordering_32x32_haarFor Daub8 wavelets the picture is not as clean because the nonzero terms do not fall on example powers of two, but there is still strong structure and the non-zero terms are concentrated:

ordering_32x32_daub8The code used to create the ordering is by  Ravi Lakkundi  from Mathworks File Exchange (BSD License) and is:

function A = mapping(n)
% To create a Morton Scan order matrix
if n == 2
A = [1 2; 3 4];
else
B = mapping(n/2);
A = [B B+(n/2)^2; B+(n/2)^2*2 B+(n/2)^2*3];
end

Blind Deconvolution with Feathered Hybrid Image

A slight modification can be made to the previous example of deconvolving an image with kernel that varies by blocks. Again we take the original image:

Original ImageBlur it with four different box kernels:

BlurImages1to4And then combine 256 x 256 blocks from each of the blurred images to create a hybrid image with a block-varying kernel. This time I feather the boundary of each block  so that there are no hard boundaries. This is done in the hopes of reducing the ringing effects. We do not only the boundaries in the image but also on the outsides edges of the image with the top/bottom and left/right:

HybridImageFeatheredNow we can see the results of the Lucy-Richardson deconvolution (see the previous post) lack so the the artifacts. On the other hand, new ones exist: FeatheredHybridLucyResults100Now I see that the image edges still have crude artifacts. It’s possible that extending the edges in a different way may save the 3rd and 4th image from severe artifacting but it is not clear what to expect.